CP4 Disaster Prevention Kit from S&S Diesel Motorsports

I just recently finished installing a CP4 Disaster Prevention Kit (DPK) from S&S Diesel Motorsports on the 6.7 L Ford Diesel. The CP4 is the Bosch high pressure fuel pump that supplies fuel to the injectors. These pumps are very sensitive to dirt and water in the fuel and went they fail they fill the entire fuel system with bits of metal. To repair the vehicle after a failure of the CP4 requires the replacement of the ENTIRE FUEL SYSTEM. Very expensive!

The DPK creates a bypass on the fuel system that allows any debris created when the CP4 grenades to be trapped by an addition fuel filter added to the fuel return line.

It seemed like a good investment. It is a $400 kit that protects from having to replace the entire fuel system which is probably $10K if you do it yourself, and $20K if the dealer does it. Seems like a no-brainer to me!

This truck has 193K miles on it, and sooner or later that CP4 is going to grenade. With the kit installed, I will have to replace the pump and the return fuel filter and I will be done. Not a small job, but smaller than replacing the entire fuel system.

Normally, the fuel comes from the tank via 2 fuel filters and is supplied to the crankcase area of the CP4 pump.  The fuel lubricates the internals of the pump and then is passed to the cylinders which boost the pressure to something over 20,000 PSI.  Excess pressure from the crankcase is returned to the fuel tank.  If the pump fails, metal debris travels from the crankcase of the pump to the high pressure section and is then delivered to the injectors.  Injectors have microscopic orifices that become clogged by the metal bits and in addition these bits of that also  clog the injector supply lines and are returned to the fuel tank by the high pressure return from the pump.

The CP4 pump is driven off the camshaft and is located in the lifter valley under the intake manifold. The DPK bypasses fuel from the crankcase of the pump and instead supplies clean fuel directly from the fuel filter.  Bypass fuel from the pump crankcase is returned to the tank after it goes through an additional fuel filter thereby eliminating contaminating the rest of the fuel system.

To get to the CP4 you have to take the entire intake manifold off the engine, and to get the manifold off requires the removal of the both of the turbo charger charge pipes, several coolant lines, the low pressure fuel filter.  The intake manifold is a two piece design, the upper made out of plastic.  The upper manifold has 15 bolts that hold it to the lower manifold, and four of those bolts on the rear are very hard to get to under the cowl.  It requires a small 1/4 inch drive ratchet with very short wobble or U-joint sockets to get to those bolts.  There is not room under the cowl for the ratchet, a separate U-joint, and a socket.  I had to get a set of sockets from Harbor Freight since I didn’t own any.  (Yep, I don’t have EVERY tool made but I am working on it!)  I also purchased a 1/4 extended reach battery powered ratchet, that thing worked GREAT!  Once you have the intake off it is relatively easy to remove the control valve from the pump, put the adapter on between the control valve and the pump body and bolt the valve back in.  Run the supplied hoses back to the original fuel filter and the added new return fuel filter and then put the whole mess back together!

I was quoted $2100 by a local shop to install the S&S DPK.  I spent $400 for the kit, $200 for tools, and $3.49 for band aids.  So for about $603.49 and 10 hours of my time I saved myself $1496 or $149 per hour for my labor.  Not bad!  And having done it once, I can do it faster the next time, when the pump needs replacement!

Here are the big pieces that must be removed to get to the CP4


Upper intake removed. Very close fit under the cowl.

1/4 ” extended reach battery powered ratchet was worth every penny on this project!

CP4 Kit after install, note the new white fuel filter on the firewall.

Adapting Automobile Scissors Lift for Can-Am Three Wheeler

I have been riding motorcycles since 1971.  My first bike was a ’66 Honda 305 Super Hawk that had been sitting for a very long time on the front porch of a Duplex in Pompano Beach, Florida.  The guy that owned it was moving and had to sell it fast, so I got it cheap.  Having not been run for quite a while, I had to find a way to get it home to Hollywood. (about 20 miles) I got a friend to drop me off at the Duplex with some tools and a gallon fuel can.  After a few hours I got it running rode it home.  It was very rough.  I fixed up the mechanical problems and rode it around for a week or so then took it completely apart and repainted the bike.  When it was done it looked like new and ran great too.

Well, that was typically how it was with me, fix bikes up and ride them.  As I got older I found that squatting down beside a motorcycle to work on it was getting harder on my old body.  So, when I finally laid out the bucks for a motorcycle lift my old back was very thankful.   Now, I have a new issue, I have a three wheel Can-Am and that doesn’t fit on my motorcycle lift.  I added some lights to the Can-Am which required some sitting and laying in the floor which greatly angered my back.  Getting down in the floor is not a real problem, getting back up is!

Well, getting out of the two wheel motorcycle world I decided to sell the motorcycle lift.  Now, what to do with the Can-Am.  You can purchase a wide deck motorcycle lift for three and four wheelers, but I already had a automobile scissors lift, why not use that?  My first attempts at getting the Can-Am on my Bendpak lift were iffy at best.  I got it up there but the lifting points were too close together and it was not very stable.  The lift was not designed to handle that centered rear wheel.

After playing around with the Can-Am on the lift and giving it some thought, I figured out that what I needed was a flat platform for the rear wheel.  The lifting arms are plenty strong enough to support it, all I needed to do was fabricate the platform.  I would also need a ramp to allow the rear wheel of the Can-Am to roll up on the scissors lift.   I did some measuring and purchased a 36″ X 36″ piece of 3/16 steel plate.  The lifting arms have to bolts in the ends that act as stops for the lifting pads.  I turned the arms on the rear of the lift backwards, and drilled two holes in the plate and used the stop bolts to secure the plate to the rear arms of the lift.  That would keep the platform from moving around.

I needed the ramp, so I needed to bend the 3/16 plate down just behind the lifting arms.  My little press brake couldn’t handle 36″ wide material so I used a cutoff wheel on a 4 1/2 inch grinder to cut a groove in the plate.  With a good groove in the plate I was able to bend the ramp section down to the floor.  Once I had the bend, I laid down a bead of weld in the grove to provide strength and keep the ramp from bending more.

Platform with groove welded. The plate is attached to lift arms with the stop bolt on each side. The clamps on the front were there to hold the plate while bending down the ramp section.
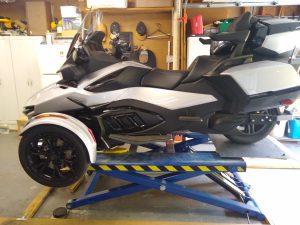
Can-Am up on the lift and very stable now with the rear wheel supported

The Can-Am on the lift. The rear wheel rolls up easily on the the platform. I adjusted the front lifting arms to pick up on the front edge of the frame that is just in front and inboard of the rider floorboards. You could also move the arms out and lift at ball joint on the lower control arm of the front suspension.
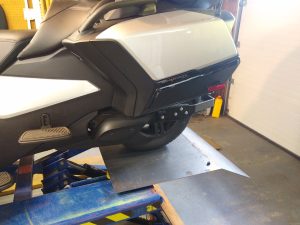
 

The rear wheel rolls up the ramp and is well supported on the platform over the lifting arms. The stop bolts keep the platform from moving.

This has worked out very well for lifting the Can-Am up to where an old guy and work on it without creating more back problems!  What do you think of this idea?  Let me know by leaving a comment below.

Thanks

DE N4RFC


Something worth remembering

It is funny how you can remember some things, especially from long ago, and can’t remember others.  Frequently these days I go to the refrigerator, open the door and can’t for the life of me remember what I wanted in there….but I remember this from studying history.    This is a quote from Dwight D.  Eisenhower after seeing one of the German Death Camps.  Somehow he knew what was going to happen.  And we are there now, it is happening today….huge numbers of “bastards” deigning the holocaust.


Mule Traders

MULE TRADERS

Curtis & Leroy saw an ad in the Herald-Citizen in Cookeville, Tn. and bought a mule for $100.

The farmer agreed to deliver the mule the next day.

The next morning the farmer drove up and said, “Sorry, fellows, I have some bad news, the mule died last night .”

Curtis & Leroy replied, “Well, then just give us our money back.”

The farmer said, “Can’t do that. I went and spent it already.”

They said, “OK then, just bring us the dead mule.”

The farmer asked, “What in the world ya’ll gonna do with a dead mule?”

Curtis said, “We gonna raffle him off.”

The farmer said, “You can’t raffle off a dead mule!”

Leroy said, “We shore can! Heck, we don’t hafta tell nobody he’s dead!”

A couple of weeks later, the farmer ran into Curtis & Leroy at the IGA grocery store and asked, “What’d you fellers ever do with that dead mule?”

They said, “We raffled him off like we said we wuz gonna do.”

Leroy said, “Shucks, we sold 1000 tickets fer two dollars apiece and made a profit of $1,998.00.

The farmer said, “My Lord, didn’t anyone complain?”

Curtis said, “Well, the feller who won got upset. So, we gave him his two dollars back.”

Curtis and Leroy now work for the government.

A Jammer on the 30 Meter Band?

August 2, 2023 0200Z:

I was trying to copy the German RTTY Weather station on 10.1008 MHz and came across what looks like a jammer signal from 10.100 MHz to 10.120 MHz.  Here is a short video.

It is now 0225Z and it is still going strong.  Anyone know what this is ?

DE N4RFC

0310Z still ripping on 30 Meters!

Next Page »